Sunday, December 27, 2009

4-Components and chairs

Merry Christmas all. The ground's been covered with snow for several weeks. This is unusual in this part of Colorado. I deal with my fishing withdrawals by doing a little casting on the grass. Now I'm suffering.

I've gotten committed to building four Adirondack chairs and had to take down the rod building to make room for chair painting -- 39 parts per chair -- two coats, then a final coat on the assembled chair.

Here is a picture of the component parts for the rod. I chose a Curly Koa wood spacer because the color is similar to the rod blank and the curl highlights the similar curl in the blank. The guides are Hopkins-Holloway titanium, chosen for their finish and in hope that they would require less preparation. The cork is red colored burl and burnt burl. The components all came from Anglers Workshop.

I won't turn the blog into a beginning rod building class. You will see features of the rod being built, and I will present information that I didn't find readily available. You can find good reference information at Flex Coat and a good document by Al Campbell that discuss rod building from the start.

The next post will get back to serious stuff when I determine the guide spacing. I've developed a spreadsheet that aids in spacing guides so that they don't fall on a ferrule location.

Friday, December 11, 2009

3-Spigot Ferrules


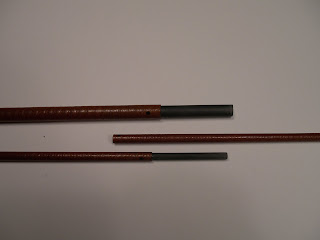
A spigot is a tapered plug for the hole in a cask, thus we have a "spigot" ferrule. The blank is cut. A tapered spigot is fit into the butt section so that it protrudes an inch or so through. The tip section fits over the protruding spigot, and we have our spigot ferrule (below). I will call it a "tip over butt" ferrule because the tip (female) fits over the butt (male), which is opposite a standard metal ferrule configuration to the right.

I first cut a few inches of the butt of the blank to get a total length of eight feet, and then cut that into three equal length sections. Actually I marked the rod spline before cutting. More about that later. At each cut I recorded the inside diameter and taper. See the drawing.

The only thing that holds the rod together and aligns the sections is the press fit of the spigot into the blank. The taper being the same as the inside of the blank is the most critical parameter. That is why I choose to have Devo the machinist turn the spigots.


The first challenge was finding material to make the spigot. The diameter is small enough that solid stock is required. I found carbon fiber rod at Aerospace Composite Products, and for $23 purchases enough for half a dozen rods of this size.

Devo turned two spigots so accurately that when fitted together without glue the rod sections could be assembled and whipped around like we all do when picking up a new fly rod. Gluing the spigot into the butt section requires some thought and preparation. I used two-ton water proof epoxy. After mixing I heated it in the microwave for ten seconds. This changed the viscosity so that it was more liquid and could form a thinner layer on the inside of the blank. Glue was applied with a Qtip, and the spigot dropped into the butt section. Preparation meant that I had a dowell ready to push it through the glue. It also meant that after giving it a twist to spread glue, and pulling it tight I had a rag pre-wetted with acitone to wipe the protruding spigot clean.

The next day I slid the tip sections onto the spigots and marked how much to cut off the large ends of the tip sections to have a 1/4 inch gap when reassembled. This gap allows for wear in the future. I will always be able to assemble the sections without the two pieces of rod butting together before the fit is tight. By the way, I cut the blank with a carbide tipped blade on my power saw.

In the next post I will write about marking the rod spline and spacing guides. All the remaining components are on order.

Friday, December 4, 2009

2-The big #9 and lead core line


This is off subject from building a rod, but I'm more of a cat herder than compulsively focused. The nine weight was put to the test on Vancouver Island, BC this year. My only concern had been the strength of the front ferrule. It seemed small compared to the large rear ferrule. No problem. Fishing the Snowmas River in high water required heavy sinking lines that are hard to pickup out of the water and put lots of strain on the rod. Then there is the fish.

We arrived during the spawn cycle of the salmon run. They weren't feeding, but the steelhead were. They follow salmon and feed on the eggs. My partner and I hooked thirty to forty in three days -- one on a dry fly. At one point I was out of the boat casting into a spawning flat and drifting an egg pattern over a drop-off. The fish that hit was big. Our guide yelled to get in the boat. There was no other was to fight the fish. It pulled two to three hundred feet of line off my reel while we followed it down stream into deep water. After one jump and five more minutes of fight the hook pulled loose. The fish was a three foot plus chinook, the only salmon hooked. The rod and Martin reel were a great combination.

Now for the humor break. I didn't fish this setup until the fourth day. The first fish was hooked by the tenth cast. Things were going well until the reel face including the crank fell off. I managed to control the line against the rod handle with my index finger and also replace the reel face. The fish was still on, but shortly the reel fell apart again. I began to imagine the guide's thoughts about the guy with the home made rod and vintage reel. At the same time I didn't hear any LOL from my partner in the stern. I should have. I'd earned it. The steelhead was landed. She had to be embarassed. As it turned out, I had incorrectly installed the reel face when changing spools the previous night.

The Martin reel and lead core line are both over thirty years old. Lead core has no memory and won't retain coils from the small diameter spool. The reel itself has a 3-1 crank ratio. It could easily bring in the line when a big fish changed direction. Coiling and retrieval speed are the current arguments favoring large arbor reels. Have you heard of fly fishing lead core line? Let me go off on that tangent for a bit.

Dad and I fished Pyramid Lake north of Reno Nevada in the early 70's. We used spinning gear until Mid, the rod builder, introduced dad to a ten weight fly rod with a lead core shooting head. Dad never turned back. I didn't have the funds or skill to change. The lead core could be cast a good distance and sank quickly. Dad and mom later moved to Grants Pass and took the technique to the Rogue River and steelhead fishing.

Lead core is a core of lead wire with a fabric wrapping. Mine weighs 16 grains per foot. It is not tapered. Deep line trollers use this line, and for their benefit it changes color every ten yards. Monofilliment is nail-knotted to one end as running line, and the leader is knotted to the other. My line has a 22 foot head to make a 350 grain line.

Casting requires that the head be out of the guides, but not far; otherwise you can't lift it off the water. Often I would double haul without a false cast. With one false cast, 80 feet seems easy. In comparison to a 400 grain Teeny line I observed these differences. The sink rate is very quick. The line doesn't belly as much in the current, and the running line doesn't present as much drag. Spend a day casting and retrieving one of these lines and your arm may fall off if your hands don't cramp first. My left hand starting to cramp was a surprise.

Next spring I will experiment with lead core of different weights at Eleven Mile in Colorado. I will try building a tapered shooting head with different weights of lead core. This line has real potential in deep water or heavy current, but little sex appeal in the modern market. In the next post I will be writing about spigot ferrules on the new rod.

Thursday, December 3, 2009

1-By way of introduction

I built my first graphite rod, a three weight, in 2002. It remains my go-to Colorado stream rod. I have since built graphite's up to 11 weight from Elkhorn blanks, which have caught many fish including bones, carp, bass, and steelhead. Many of us old guys learned to cast with a fiberglass rod -- dad wouldn't allow my to touch his cane rods. I still have three that were custom built by MID of Reno Nevada using Fenwick blanks. The six weight I continued to fish because of the feel of the slow action. That lasting interest coupled with seeing an uncut blank at a Bob's Fly Shop in Loveland Colorado, where I learned rod building, got me thinking. A three piece fiberglass rod could live in the truck and be available for emergency carp fishing. You never know when you may spot a carp alongside the road.

Fiberglass seemed like a good choice for carp. It's strong, durable, can make a delicate presentation (carp are spooky), and can really "put the wood" to a fish. I started out hoping for a seven weight and finished with the nine weight you see here.

The blank for this rod came from Rick's Rods. It is one of the few remaining Wright-McGill fiberglass blanks, and was full length. An uncut blank is not labeled. You select by feel. When the rod is complete you get out the lines and see what weight works best. The rod I will be describing in this blog is much lighter and feels "five-ish", we'll see.

In the next post I will discuss fishing this rod with the old Martin reel and a lead core shooting head line. Then we will get started on the new rod.